Arduino Mega with Atmega 1280 has four 16 bit timers, that could be used for various purposes, like time/frequency measurement, control with precise timing, PWM generation. Today I hope to explain how to use timer for clocks, timers (countdown) and other things, where You need µCPU to perform some tasks after precise period of time. I’ll give You two examples:
- Pseudo 1 second timer
- Real 1 second timer
How counter works? It is simple independent 16 bit accumulator, which value increases by 1 at clock cycle. 16 bit means that maximum counter’s value is 65536. When this value is reached counter starts counting from 0 again and gives hardware interrupt. Counter value could be changed any time. This is normal counter mode, Atmega 1280 offers total 14 operating modes.
Pseudo 1 second timer (1.048576 s)
This is the simplest example of timer, LED is turned on for “1 second”, and when turned off.
// timer example from electronicsblog.net
#define LED 13

boolean x=false;

ISR(TIMER1_OVF_vect) {
x=!x;
}

void setup() {

pinMode(LED, OUTPUT);

TIMSK1=0x01; // enabled global and timer overflow interrupt;
TCCR1A = 0x00; // normal operation page 148 (mode0);
TCNT1=0x0000; // 16bit counter register
TCCR1B = 0x04; // start timer/ set clock
};

void loop () {

digitalWrite(LED, x);

};
ISR(TIMER1_OVF_vect) {} is interrupt function, which is called when timer1 overflow interrupt occurs. Here You should put task to perform after timer overflow. It is recommended to put as shorter code as You can. It’s precaution, because if another hardware interrupt occurs while performing the first’s tasks, CPU jumps to perform second’s interrupt’s routine, although first’s is unfinished. In this example I just invert variable “x”.
TIMSK1 is Interrupt Mask Register for timer 1 , we need to enable overflow interrupt, so we set LSB to 1;
TCCR1A – reset all bits to enable normal timer mode.
TCNT1 is 16 bit register, that saves counter value. It is set to 0x0000 to make sure that counter starts from 0.
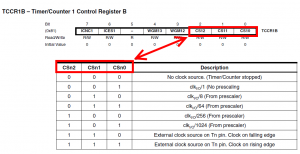
TCCR1B register’s 3 first bits saves value of counter clock prescaler:
By setting TCCR1B register to 0x04 we using /256 prescaler. Atmega in Arduino Mega board is clocked at 16 MHz, accordingly timer’s clock frequency is 16000000/256=62500 Hz. Because timers max value is 65536 it overflows every 65536/62500 =1.048576 seconds. At first look difference from real 1 second is small, but if clock uses this 1.048576 s interval as 1 second it will be 3 minutes behind after 1 hour.
In loop we set or clear LED accordingly to variable x value, which is inverted at every timers interrupt, or 1.048576 seconds.
Result:
Real 1 second timer
To have more precise 1 second timer we need to change only one thing – timer’s start value saved by TCNT1 register. Overflow’s period is calculated by dividing counter’s interval by counters clock frequency. Using max interval (65536) and /256 prescaler we have 65536/62500 = 1.048576 s. It is easy to see if we need 1 second timer counter interval must be 62500. So it should be 65536-62500 = 3036 shorter than maximum, to do that we need to set counter start value to 0x0BDC (hex of 3036) – TCNT1=0x0BDC;
// timer example from electronicsblog.net
#define LED 13

boolean x=false;

ISR(TIMER1_OVF_vect) {
TCNT1=0x0BDC; // set initial value to remove time error (16bit counter register)
  x=!x;
}

void setup() {

pinMode(LED, OUTPUT);

TIMSK1=0x01; // enabled global and timer overflow interrupt;
TCCR1A = 0x00; // normal operation page 148 (mode0);
TCNT1=0x0BDC; // set initial value to remove time error (16bit counter register)
TCCR1B = 0x04; // start timer/ set clock

};

void loop () {

digitalWrite(LED, x);

};
Result:
After almost one hour our Arduino clock are showing the same time as referenced clock.
